[Wigglecam]
![[Wigglecam]](/content/images/size/w1200/2026/03/IMG_20211029_154220-1.jpg)
In this post I will revisit the Wigglecam I built over four years ago.
In 2021 I stumbled across a blog post by Joshua Bird in which he showed a 3D printed Wigglegram Lens he built for his Canon A1. And I was in love with the idea. I however wanted to do my own design for the EF lens mount.
Ok maybe you are still wondering what even is a wigglecam or a wigglegram? Essentially it's a camera which takes multiple images at the same time from slightly different perspectives. If played as a video back and forth the image will wiggle and give a slight sense of depth.
Building the Lens
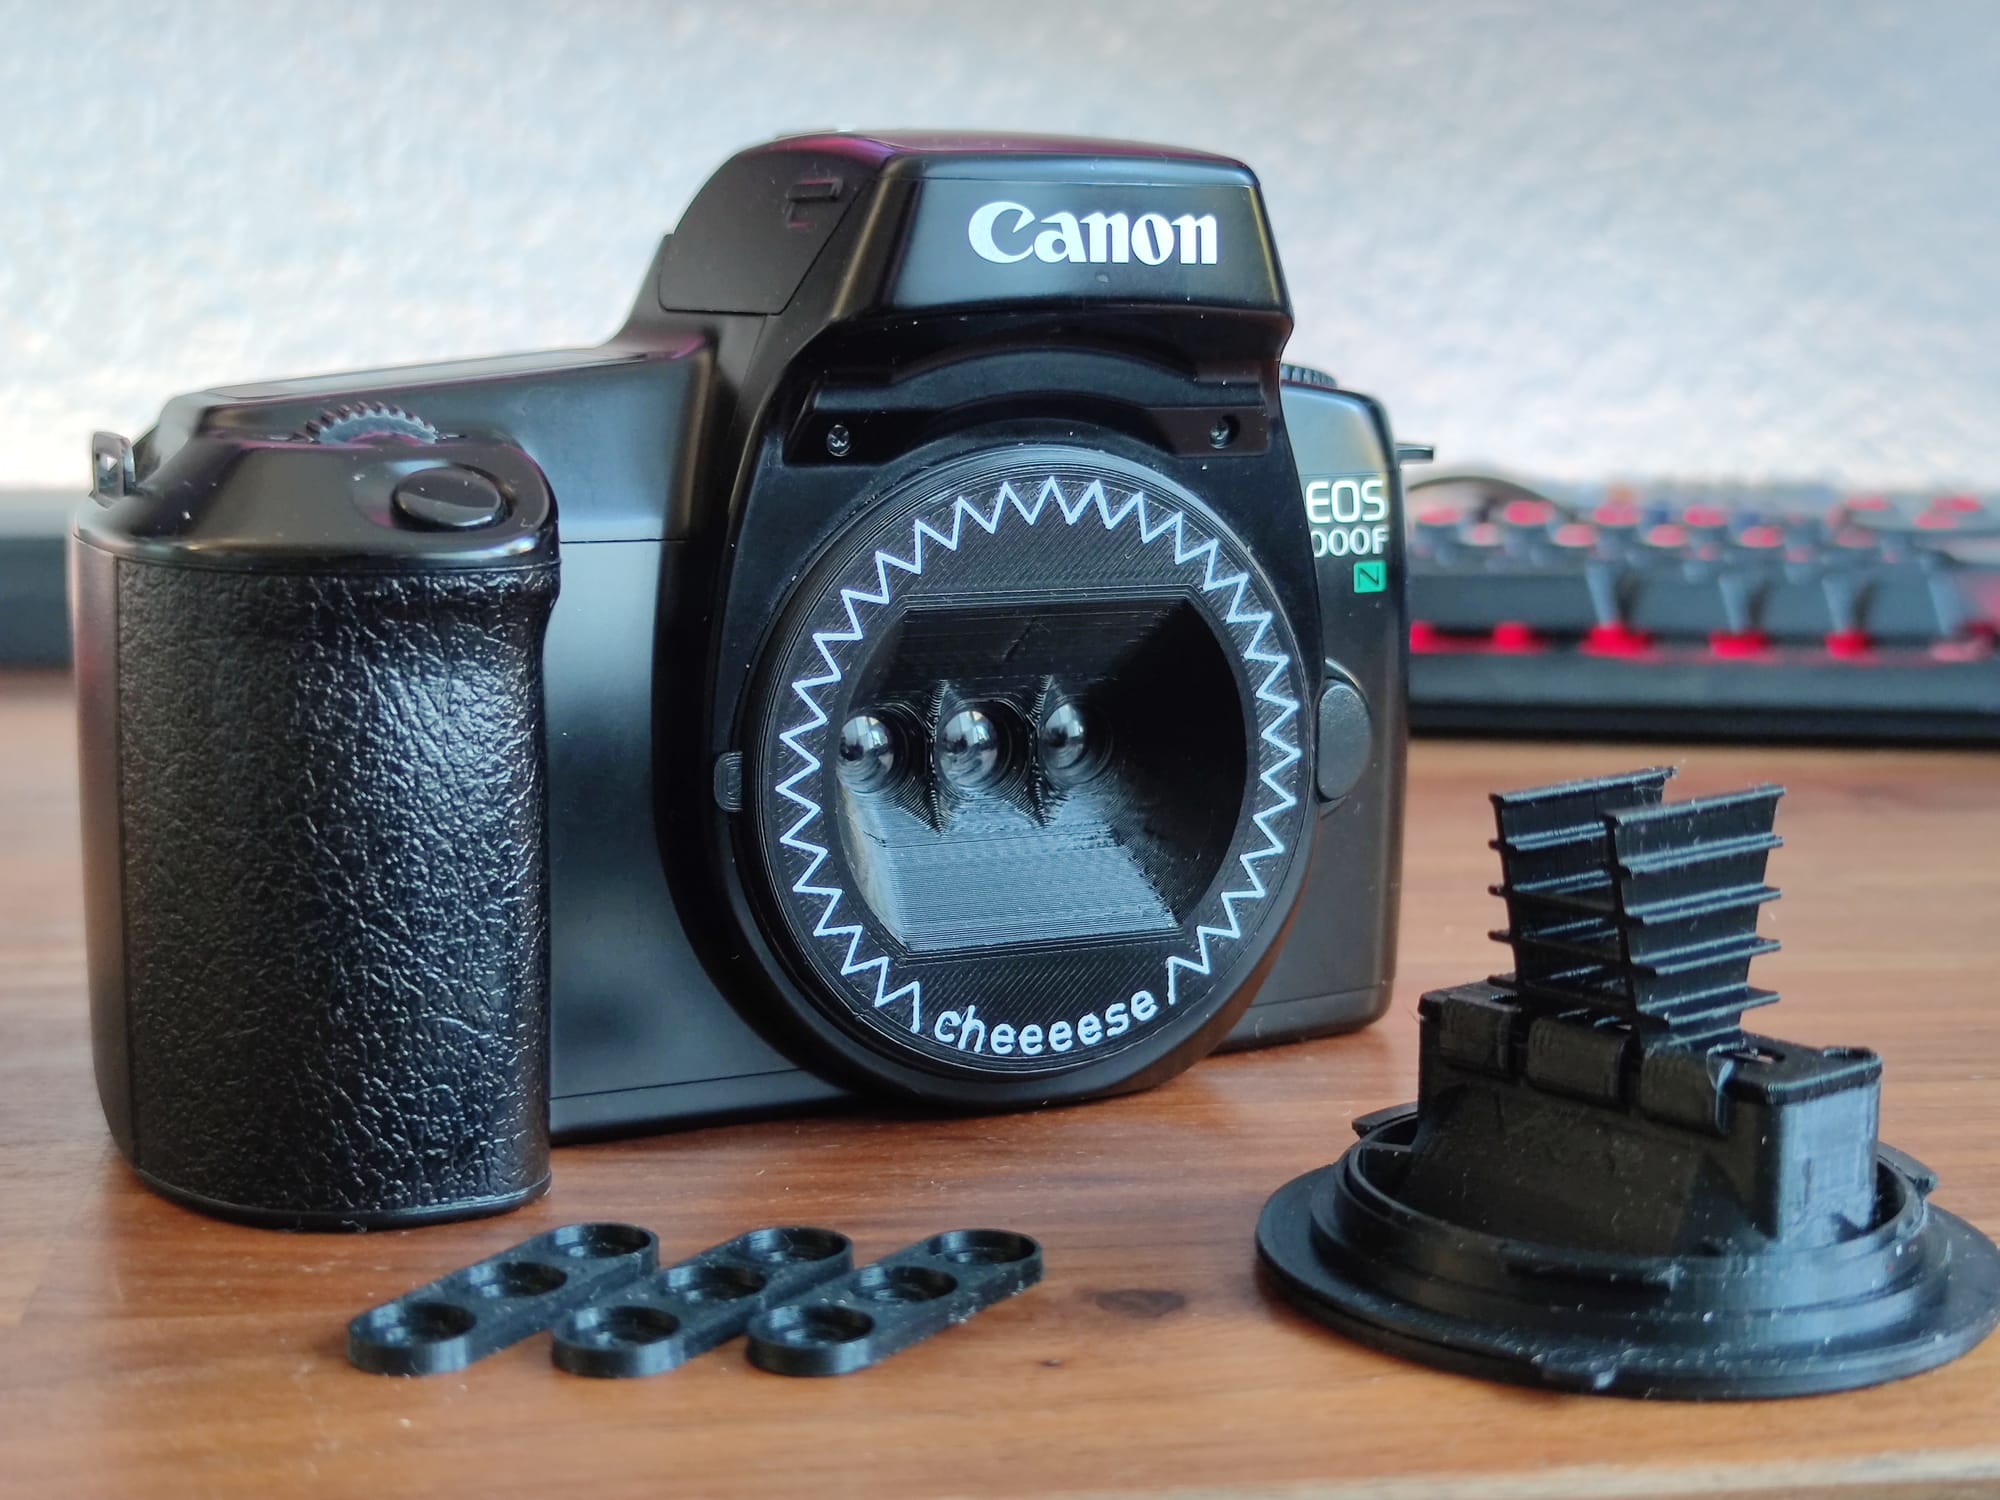
The Lenses
For the Lenses I went with 3 Meniscus Lenses from Kodak Daylight disposable cameras. They have a focal length of 32.8mm, which means with a Flange focal length of 44mm for EF mount the lenses need to extend inside the the camera body.
What I also learned is that while you can just get a few disposable cameras and extract the lenses and the film, you can get these lenses very easily for free by just asking at your local photo shop. When people drop disposable cameras off to get them developed the photo shops will just take out the film canister and toss the camera on a pile. They will likely hand out these 'used' disposable cameras for free.
The Build
This was a long time ago so I don't remember much, but I already had the design philosophy to make sure the print orientation always makes sense and that it would print entirely without supports.
Very similar to Joshuas design I also used dividers that would reach inside the camera body, seperating the images from each other. I added baffles to the divider, but I didn't test if that makes any noticeable difference.
Because the dividers and Lens assembly reach inside the body it would have been impossible to rotate it to lock in the Lens mount. Instead I added a rotating ring to the lens which enables the locking mechanism.
And that was mostly it. For assembly I added two screws to hold the lenses and apertures in place. I printed the apertures seperately so they would lay flat on the print bed and the lines are as sharp as possible. Later I also glued the lenses in place. While they are not super sensitive to small displacements, it turned out to be annoying in post when they were ever so slightly different for every picture taken.
Making the Wigglegrams
If i was to revisit this project today I would do everything in TouchDesigner. But I didn't even know what TouchDesigner was in 2021. I will try to focus on some learnings here.
Film Scans
This topic is annoying. When you get film digitized in your local photo shop, each image will get slightly cropped. Not a lot. But enough to hurt your wigglegrams. I built the lens so it would take 3 images with exactly the same width on the 35mm film. If this combined image is now cropped, the left image gets cropped on the left the middle image wont be cropped and the right image is cropped on the right. This reduces the overlap between the images drastically.
The only real solution is to have your films camera scanned. Which is either expensive or the results won't be great. Camera scanning at home is definitely possible, but especially the inversion is difficult without the right software.
Aligning the Images
This step I did in Davinci Resolve Fusion, which worked, but wasn't optimal. For each image you decide on a point which will stay stationary. I found that i prefer this point to be somewhere in the middle of the depth of the image, because that means the foreground and background move in opposite directions in the wigglegram.
I think I also did some lens distortion correction because the lenses were not perfectly aligned, but there isn't much more to it. There is also a bunch of tutorials on YouTube these days, though I'm not sure if they are any good.
Conclusion
This was a cool project, but the digitizing of the films and wigglegram creation workflow stopped me from shooting more than a few films with it. On the other hand this is probably the most unique camera look you can get for $20 or less, with essentially only the cost of the EF Camera if you own a 3D Printer.